
Fine tune your site configuration from dashboard
Sites Overview: To view all sites of your organization, click on ‘Sites’ from sidebar. Here you can view all the sites. If you don’t have any sites you can click on “Create Site”.

At no sites

Site Details: #
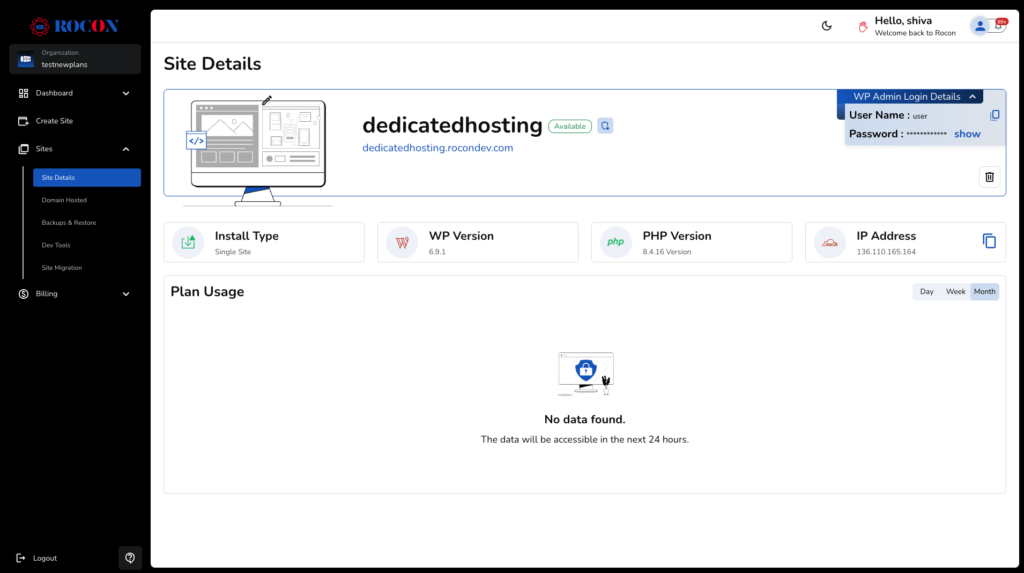
To view site details, click on a site then it will redirect you to ‘Site Details’ page. Here you can find below mentioned things.
- Site Name: This is the unique name of your WordPress website. It’s the primary identifier for your online presence.
- PHP Admin: Clicking this button takes you to the PHPMyAdmin interface. This powerful tool allows you to directly manage your website’s database. You can perform tasks like creating, modifying, and deleting database tables and records.
- WP Admin: This button redirects you to the WordPress Dashboard, the central control panel for your website. Here, you can create and edit posts, pages, and other content, customize your site’s appearance, install plugins, and manage user accounts.
- Environment: This section indicates the current environment of your website. It could be “Production,” “Staging,” or “Development.” This information helps you understand the purpose and configuration of your site. This option is available only for kubernetes hosted site.

- WP Login Details: This section provides you the username and password of wp-admin. Click to expand and select show to reveal password. This is available only for dedicated hosted site.
- Create Blueprint or Clone: These options allow you to create a copy of your website. A blueprint is a template that can be used to create new sites, while a clone is an exact replica of your current site.


- Delete: Use this option with extreme caution. Clicking “Delete” will permanently remove your website and all associated data.

- Install Type: This section clarifies the configuration of your WordPress installation:
- Single Site: A standard WordPress installation with a single website.
- Multisite: A network of multiple websites under a single WordPress installation.
- Multi-Subdomain: A specific type of Multisite where each site has its own subdomain.
- WP Version: This displays the version of WordPress software your site is currently using.
- PHP Version: This shows the version of PHP, the scripting language that powers your WordPress site.
- IP Address: This is the IP address of your website’s server. It’s a unique identifier for the server’s location on the internet.
- Plans Usage: For detailed information about your current plan’s usage, refer to the site metrics page. This page provides insights into resource consumption, storage usage, and other relevant metrics. Please refer to site metrics page to learn more.
Note: WordPress Admin panel id and password will be, your WordPressUsername_Sitename and password is same as your site’s password.
The SiteDetails tab offers a comprehensive overview of your WordPress site, including essential information about its setup, configuration, and associated actions. Use this tab to keep track of your site’s details and conveniently manage it within the ROCON platform.
Domains Hosted: #
The Domains Hosted tab provides overview of all the domains associated with your selected site.
- Domains: Here you can see all the domains added for the site. This includes both primary domains and any additional domains you have configured. You can quickly scan through the list to view the domains associated with your site.
- SSL Status and Expiration: For each domain listed, you can view the SSL status and expiration information if the SSL certificate is provided by ROCON. This enables you to monitor the validity of your SSL certificates and take necessary actions to renew or update them as needed.
- Pointing New Domains: If you wish to set up a new domain for your site, you can refer to the Point your domain section . This section provides step-by-step instructions and guidelines on how to add,configure and point your domain. Follow these instructions to ensure a smooth setup process for your new domain.
The Domains Hosted tab provides a centralized view of all your domains associated with the selected site. It helps you manage and monitor your domain configurations effectively. Utilize the search functionality to quickly locate specific domains, and stay informed about SSL status and expiration for enhanced security. For setting up new domains, refer to the documentation’s “Point your domain” section for comprehensive guidance.

Backups & Restore: #
The Backups & Restore provides you view of the backups available for your sites. Here’s what you can expect from this tab:
- File systyem Backups: This section displays the backups taken for the file system of your site. These backups capture the entire state of your site’s File explorer. You can view the list of available backups and their respective timestamps.
- Database Backups: In the Database Backups section, you can find backups of your site’s database. The database contains vital information such as posts, pages, settings, and user data. Similar to namespace backups, you can see the list of available database backups and their timestamps.
- OnDemand Backups: If you want to have a backup for that instance click on “Create OnDemand Backup” to create a backup of your site until that instance.
- Downloading Backups: For each backup, you have the option to download the backup file as a zip archive. This allows you to have a local copy of your database backup for safekeeping or further analysis. If
- Restoring Backups: If you wish to restore backup, you can click on Restore button to start the restoration of your site.
Note: For dedicated hosted site you can’t download backup. If any of your backups fail at any point, you will receive a notification.
The Backups & Restore Tab provides you with essential backup management capabilities, enabling you to download database backups for local storage and selectively restore backups to revert your site to a previous state. Regular backups are taken every 24 hours, ensuring that you have recent restore points available. However, it’s important to keep in mind that restoring a backup may cause temporary downtime for your site.
Take advantage of this feature to maintain data integrity and protect against unforeseen issues

Kubernetes hosted site
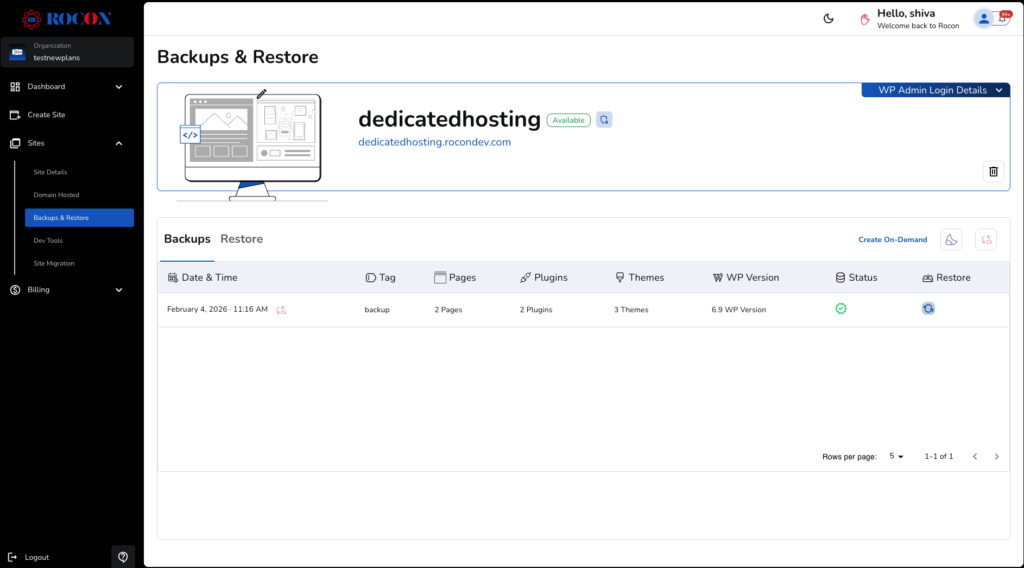
Dedicated hosted site
Dev Tools: #
The Dev Tools tab empowers users with essential development tools and functionalities to streamline their WordPress site management.
Here’s an overview of the actions you can perform in kubernetes hosted site tab:
- Enable/Disable WP_Debug:
You can conveniently enable or disable the WP_Debug feature for your site directly from the dashboard. WP_Debug is a debugging mode in WordPress that provides detailed error messages and helps developers identify and resolve issues more effectively. By toggling this setting, you can enable or disable WP_Debug as per your requirements. - Enable/Disable WP_Cache:
You have the ability to enable or disable the WP_Cache feature for your site. WP_Cache is a caching mechanism in WordPress that improves site performance by storing pre-generated HTML output and serving it to visitors. By controlling WP_Cache from the dashboard, you can easily enable or disable this caching feature based on your site’s needs. - CDN:
Your site gets CDN which is powered by GCP (Google Cloud Platform) which speeds up your site. To learn more about GCP, please refer the documentation. - Cache invalidation:
This will flush the cache of your site entirely, so that your latest updates will show immediately to the users. - SFTP Details:
Here you can create a SFTP user, so that you can use that details to access your site’s File system using any FTP applications such as FileZilla.
With the Dev Tools tab, you have the tools at your fingertips to streamline development, debugging, caching, and database management tasks, enhancing your overall site management experience.

Kubernetes hosted site
Here’s an overview of the actions you can perform in Dedicated hosted site tab:
- Web Application Firewall (WAF):
Your site is always protected by an enabled Web Application Firewall (WAF). This provides continuous security against common web threats and unauthorized access—no action is required from your side. - CDN (Content Delivery Network):
Your site uses a CDN powered by Google Cloud Platform (GCP) to load faster for visitors by serving content from locations closest to them. - Cache Invalidation:
This option clears your site’s cache so your latest updates and changes are visible to visitors immediately. - phpMyAdmin:
You can securely access phpMyAdmin to view and manage your site’s database using a guided and safe connection process. Refer for step-by-step process on how to connect - SSH Access:
SSH allows advanced users to securely connect to the server for maintenance and troubleshooting tasks. Refer for step-by-step process on how to connect - SFTP Access:
You can securely manage your site’s files using SFTP with FTP tools such as FileZilla. Refer for step-by-step process on how to connect
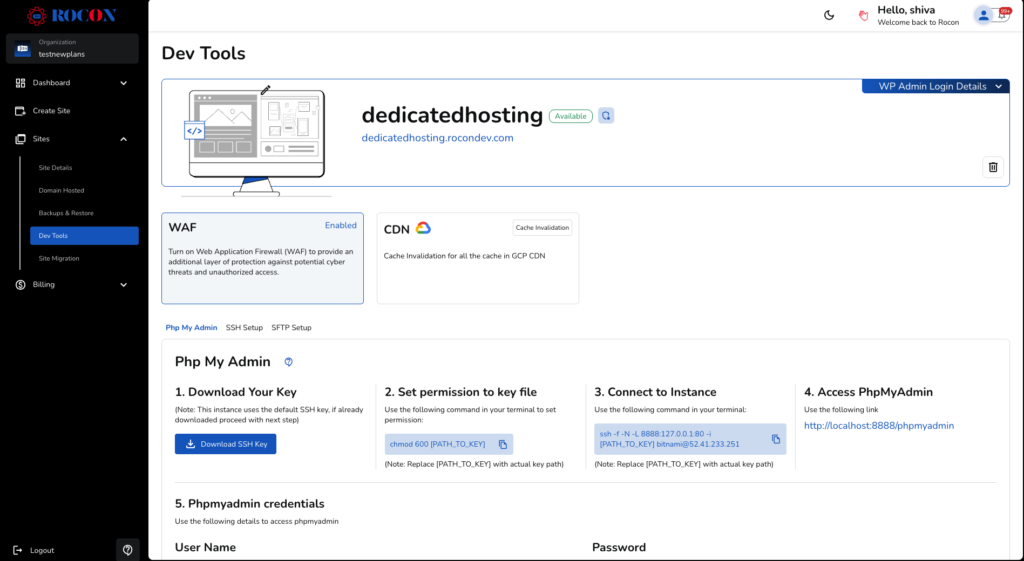
Dedicates hosted site
File Explorer: To know more, please refer to File Explorer #
Note: Dedicated hosted site will not have file explorer, please use sftp connection to access your site.
Alerts:
Your site gets scanned for every 24 hours, if there any malicious files found in your site’s database it will show an alert with the type, severity and when the alert was created. You can download the log file to debug the issue.
If you fixed the issue in your site and there’s no malicious files found the alert will be removed.


